Limit Powershell from O365 Powershell
by G. Samuel Hays
The discussion for this article is for the following situation: PingFederate configured with WSTrust to Office 365 for Active Clients such as Powershell, ActiveSync, RPC, etc.
The Problem
As you may know, Powershell is now a common tool employed by hackers and red teams when attacking a network. Given that many networks now include some or many cloud services, we must be aware of the implications of Powershell interactions when using those services.
Microsoft’s Office 365 includes Federation using WS-Trust and WS-Federation for Active and Passive clients, respectively. Now, I know that “Modern Auth” is now an option too but at the time of this writing, to my knowledge, it cannot be limited in the way I will describe here the same way STS can.
So here’s the deal. When you connect to Office 365 using PowerShell, you present credentials (usually gathered via the get-credential cmdlet). Microsoft cannot authenticate these credentials because they are not the Identity Provider (IdP) unless you are using Azure Active Directory (and while this may apply to that case, it is not what I have tested nor is it the use-case). Instead, Microsoft takes those credentials and sends an authentication message over WS-Trust back to PingFederate to authenticate the credentials. It is this choke-point that allows us to make some decisions about the connections we allow in.
The real problem is that fundamentally, I believe strongly in the idea of least-privilege and approaching security as an onion, and Microsoft allow(ed?) very few controls around this. Ideally, we use two-factor where we can, and employee other controls were we cannot. This is a case where we cannot – two-factor authentication with STS would require writing a bunch of custom code; a task beyond many PingFederate administrators. So what kinds of controls could we put in place? Well, when I worked on this problem, there was nothing we could do in the Office 365 side but with some customization we could do the following: Block STS Connections by IP address by Application
In other words - On the PingFed/STS side we look for the type(s) of application trying to authenticate and if it is sensitive (e.g., Powershell), then we check the IP address against those that we trust - like the ranges of our company - and only allow from those. This isn’t perfect, of course, but suddenly the places from which people can connect goes from the planet earth, to whatever IP blocks you define. Pretty good return on the relatively small amount of work required.
The set-up
The extent of the configuration really consists of the following steps:
- Enable some extended logging for PingFederate
- Make decisions based on the new information being logged
- Test
Overall, not too bad but as the reader may know - navigating the PingFederate interface can be a little annoying. So we’ve got screenshots! (PingFed 9.0.2).
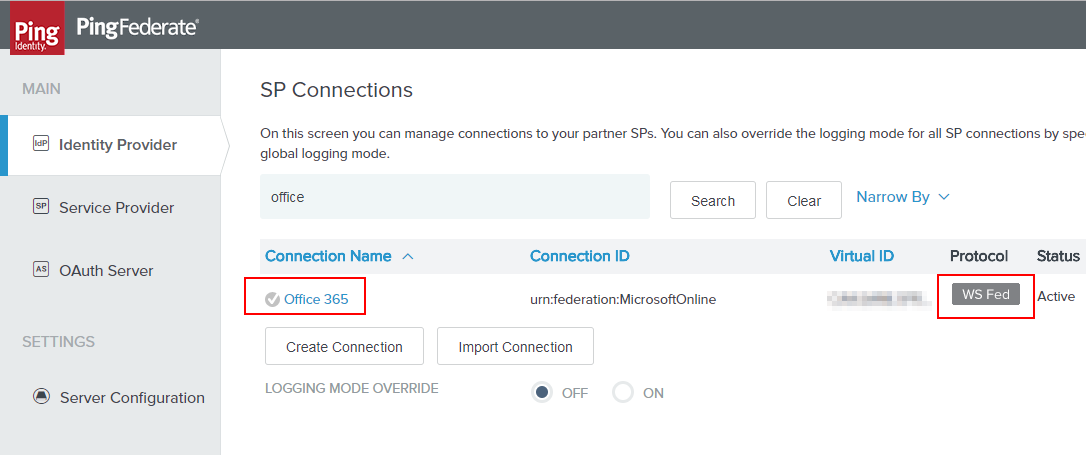
First - let’s navigate to deep in our Office SP Connection to the STS piece we care about. Again, and this is important, I am writing this for WSFed + WSTrust Office 365 Configuration! Let’s navigate to our Identity Provider section, then find our Office 365 connection in SP Connections. Note in the screenshot below I am pointing out its WSFed.
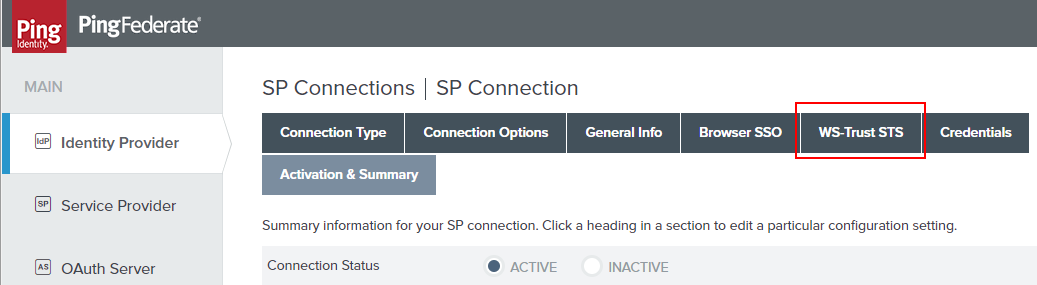
Now that we’re in that connection, we need to go deep. Click the “WS-Trust STS” section.
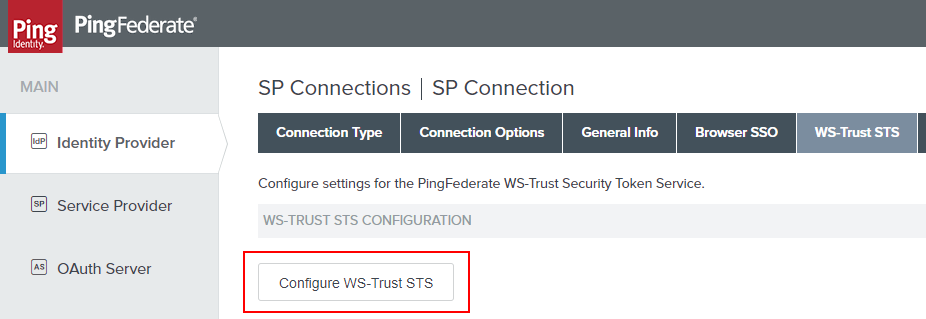
Continue to dive in. Click “Configure WS-Trust STS” button.
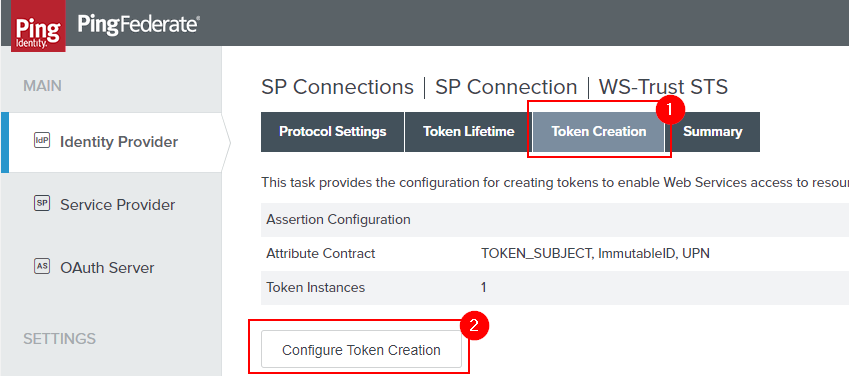
Now we need to click “Token Creation” and then “Configure Token Creation” button. (I told you - deep).
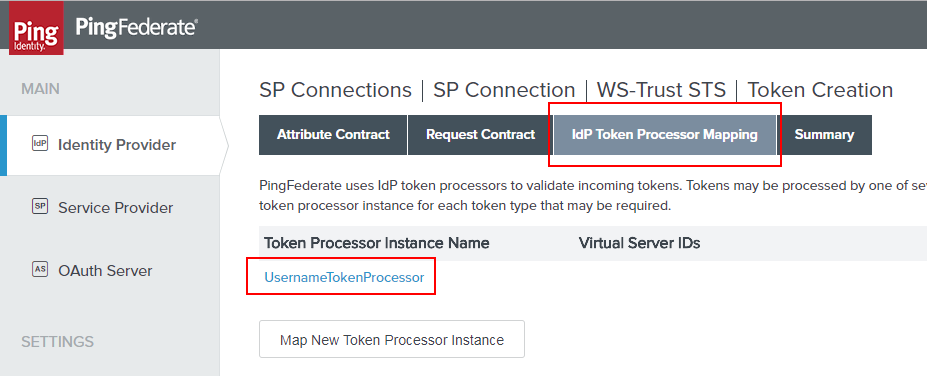
Next up - Click the “IdP Token Processor Mapping” and then click the link of the Token Processor Instance you created whenever you originally set this up.
Now we navigate to “Issuance Criteria” and “Show Advanced Criteria”. And we have arrived!
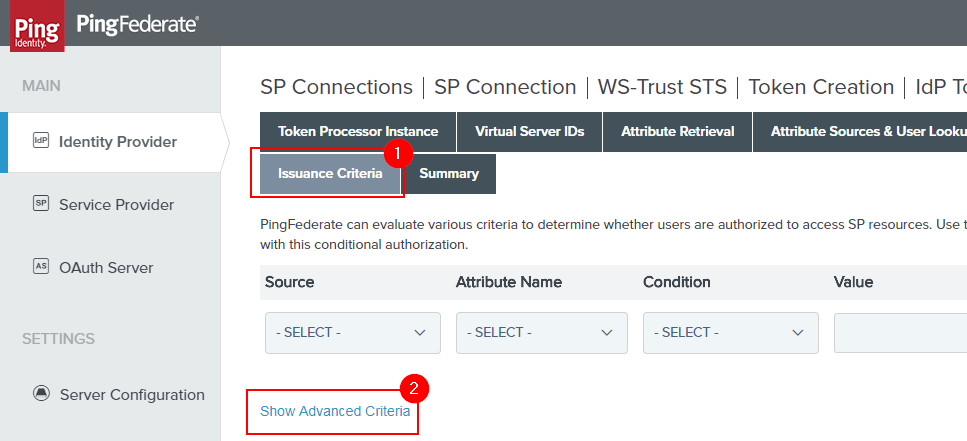
At this point, we will need to add a new Expression (Note - enable Expressions in your PingFed environment if this is unavailable to you. A google search will lead you to documentation).
Before the screenshot of this - I am going to walk through the OGNL expression that I have written and how it works. There is a link to my GitHub at the bottom if you want to start from there.
The code
Edit this before using. Read!
1
2
3
4
5
6
7
8
9
10
11
12
13
14
15
16
17
18
19
20
21
22
23
24
25
26
27
28
29
30
31
32
33
34
#log = @org.apache.commons.logging.LogFactory@getLog("com.pingidentity.ognl.logger"),
#objReq = #this.get("context.HttpRequest").getObjectValue(),
#headers = #objReq.getHeaderNames(),
#headers.{
	#hdr = #this,
	#log.debug("[STS-Logger]: " + #hdr.toString() + " = " + #objReq.getHeader(#hdr.toString()))
},

#msapp = #objReq.getHeader("X-MS-Client-Application") != null ? #objReq.getHeader("X-MS-Client-Application") : "",
#clientIpList = #objReq.getHeader("X-MS-Forwarded-Client-IP") != null ? #objReq.getHeader("X-MS-Forwarded-Client-IP") : "0.0.0.0, 0.0.0.0, 0.0.0.0",
#clientIp = #clientIpList.toString().split(',')[0],
#ipv4 = #clientIp.toString().matches("(([01]?\\d\\d?|2[0-4]\\d|25[0-5])\\.){3}([01]?\\d\\d?|2[0-4]\\d|25[0-5])"),

#subnet_1 = new org.apache.commons.net.util.SubnetUtils("10.14.30.0/24"),
#subnet_2 = new org.apache.commons.net.util.SubnetUtils("192.168.0.0/22"),

#msapp = #msapp == "Microsoft.Exchange.Powershell" ? true : false,
#inSubnet = (#msapp == true && #ipv4 == true) ? (
	#subnet_1.getInfo().isInRange(#clientIp) ||
	#subnet_2.getInfo().isInRange(#clientIp) ||
) : false,

#msapp == true ? #log.debug("[STS-Logger] clientIp = " + #clientIp) : "",
#msapp == true ? #log.debug("[STS-Logger] inSubnet = " + #inSubnet) : "",
#msapp == true ? #log.debug("[STS-Logger] isIpv4 = " + #ipv4) : "",

#allowSts = (#msapp == true && #inSubnet == true) ? true : false,
#allowSts == true ?
	#log.debug("[STS] Allowed PowerShell/STS from " + #clientIp + ".")
: (#msapp == true || #inSubnet == true) ?
	#log.debug("[STS] Blocked PowerShell/STS from " + #clientIp + ".")
: "",

#result = #msapp == true ? #allowSts : true
Code Walk-Through
- Line 1: Get an logger object so we can write to the PingFed log.
- Line 2: Get the HttpRequest object for this request to STS and store in #objReq
- Line 3: Get all the headers from the HttpRequest object (we’ll use these momentarily)
- Line 4-7: Loop through the headers and log them in the format:
[STS-Logger]: <header> = <value> - Line 9: Try to get the header
X-MS-Client-Application(which might be something like ‘Microsoft.Exchange.Powershell’ or ‘Microsoft.Exchange.ActiveSync’). If it is unavailable, assign an empty string. - Line 10: Try to get the header
X-MS-Forwarded-Client-IP(the X-Forwarded-For header or, the IP address of the caller, not the Microsoft data-center IPs). (NB: This was snagged from PingFed’s GitHub example page and they take get the credit for that part!) - Line 11: Snag the the first IP address from the clientIp list retrieved on line 10.
- Line 12: Determine if the IP address is IPv4 (the version of SubnetUtils that ships with PingFed does not support IPv6 filtering - so neither do we).
- Line 14-15: Define the IP addresses we want to trust. I have RFC1918 IPs in the example code, but you should have REAL, routable IP ranges here!!
- Line 17: Reassign #msapp to True if it matches Powershell, and False otherwise.
- Line 18-21: Set #inSubnet to True IF this is PowerShell AND the connection is IPv4 AND the connection is coming from a trusted subnet. Otherwise set to False.
- Line 23: If Powershell: Log the ClientIp
- Line 24: If Powershell: Log if the request is coming from a trusted subnet.
- Line 25: If Powershell: Log if the connection is IPv4 (all these are for debugging later if necessary).
- Line 27: Set #allowSts to true IF the connection is PowerShell AND connection is from a trusted subnet, otherwise False.
- Line 28-32: If #allowSts is True: Log that the connection was allowed and the client IP, otherwise IF application is Powershell OR In a trusted subnet is true: Log that the connection was blocked. This is a complicated line of code with a nested ternary operator. Look at it closely if you want to fully understand it.
- Line 34: Set the result to the value of #allowSts if the app is Powershell, otherwise allow the connection.
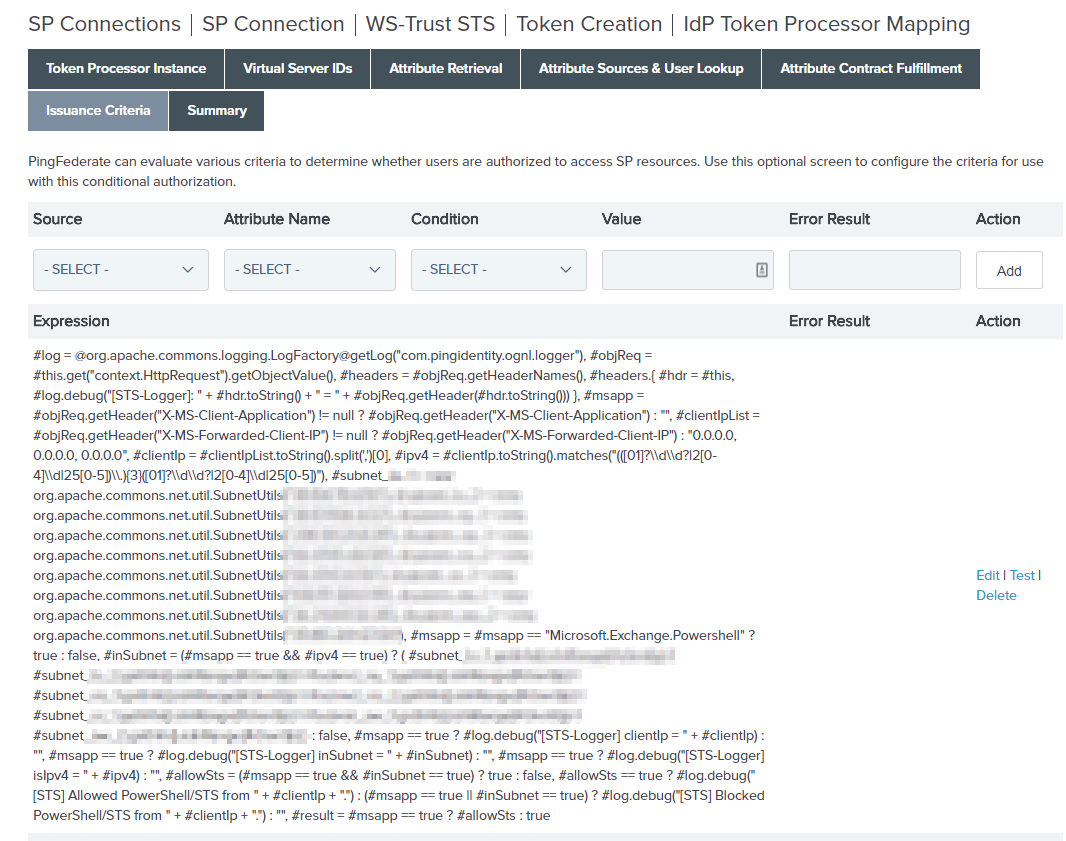
In practice, this looks like the following screenshot (I blurred out the IP ranges for privacy, but the rest is the same - also note that OGNL does not rely on line breaks whatsoever and the entire script will be saved as a single line with commas acting as the statement separator):
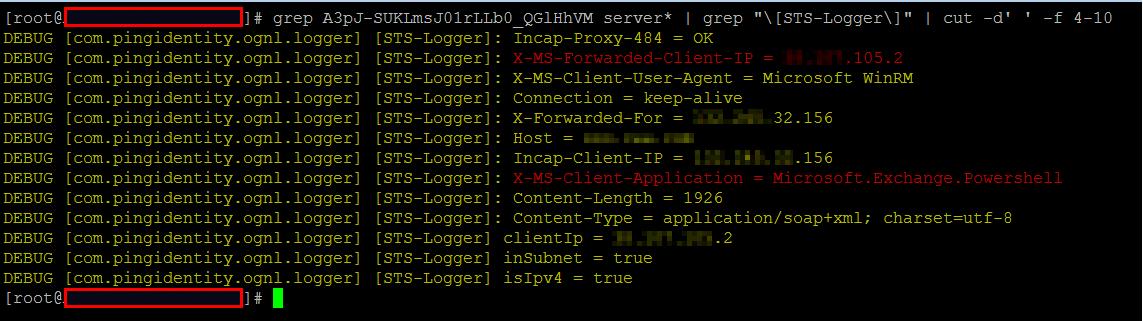
Once this has all been enabled then you should start seeing entries like the following when someone tries to connect to Office 365 via Powershell:

And similarly you will be able to see all the header information we logged in the script above. This can be very convenient if you’re using a SIEM product such as Splunk to catch abnormal behavior or connection requests.
It may not be the most beautiful solution in the world - but it gets the job done and can significantly reduce the space from which someone may try and get into your Office 365 environment. My recommendation is the following:
- Use SSO for Office 365 cloud services: require strong passwords
- Use a second factor (such as PingID) whenever possible
- If possible, In Office 365, disable STS altogether in favor of Modern Auth if possible
- If STS cannot be disabled, limit the dangerously powerful application that do not support 2FA (such as Powershell/WSTrust in the way described here) to trusted IP ranges.h
- Monitor all of this traffic very closely and very carefully!
Security is an onion. Protect your employees.
If you have questions, feel free to reach out at gsamuelhays at google’s email service dot com.
Sam
tags: blog - pingfederate - o365 - sts - sso